 |
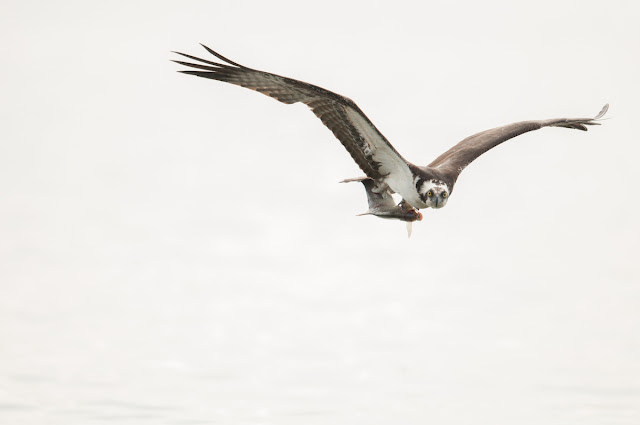
| 1/2000 | f/4 | ISO 800 | 500mm |

Before I start editing any image, I make a mental list of things that I will implement in photoshop. Below is that list for this image:
- With an overcast day, I had to shoot at a high ISO (in this case ISO 800) to get a fast enough shutter speed to freeze the action. This means that I will have to use noise reduction to, well, reduce the noise.
- Overall, the image is a bit underexposed. It's good that I didn't clip any highlights, but I also don't have much detail or contrast in the shadows. I'll use curves to brighten the image.
- The eyes always get special attention. In this case, they are a bit soft so I will implement sharpening and a bit of dodging to give them that extra 'pop'.
- The image isn't blurry, but it also isn't tack sharp (and most RAW files aren't), so I will add some sharpening to the Osprey while masking out the background.
- The composition is OK, but it would be nice to have a little more room on the right side of the image. I will use the Canvas Size tool to add room to the right and then Content Aware Fill to fill in the extra room with something realistic.
Noise reduction
The first step is to reduce the noise in the background to create a smoother and less grainy sky. Below is a zoomed in (300 %) portion of the image.
 |
| 300% zoomed in view |
- Strength: 10
- Preserve Detail: 0
- Reduce Color Noise: 20
- Sharpen Details: 0
Below are the results after I applied the filter. Notice that there is less detail in the osprey, but I will use a layer mask so that the noise reduction is only applied to the sky.
 |
| 300% zoomed in view, Noise Reduction filter applied |
* With that said, there are numerous ways to select the osprey and use that selection as a mask, but that's beyond the scope of this tutorial.
Curves
The image is overall a bit dark. Applying a curves adjustment layer will brighten the overall image. I opened up a curves adjustment layer and used the white eye-dropper tool to select the brightest part in the image that is white. In this case, I chose a portion of the sky (I could have also picked a portion of the neck). This immediately made the bright part of the image brighter. Still in the curves dialog box, I used the 'Medium Contrast' preset to adjust the tone curve. Below you can see the difference between the two images.
 |
| Original |
 |
| After Curves adjustment layer |
Dodging
Next, I wanted to brighten up the darker parts of the wings just a bit. I also took this opportunity to work on the eye. I first merged the existing layers (Layer --> Merge Visible) and then made a copy of the new background layer (Cmd + J). With the dodge tool, I set the Range to Shadows and the exposure to 10% and, with a soft edged brush (Hardness = 0%), I started painting over the darker parts of the osprey, making them a touch lighter. On the same layer, but with a smaller brush, I changed the Range to Highlights and painted over the eyes. Below is the image after dodging. Notice the that feathers have a little more detail and the eyes are a also little lighter.
 |
| After dodging the darker areas of the wing and the eyes |
Sharpening
One of the final steps was to sharpen the image. Again, I flattened the image and created a new layer. Then, using the Smart Sharpen filter (under the Filter drop down menu), I applied the following settings:
Amount: 75%
Radius: 1
 |
| Result of sharpening with the Smart Sharpen filter |
Adding Canvas
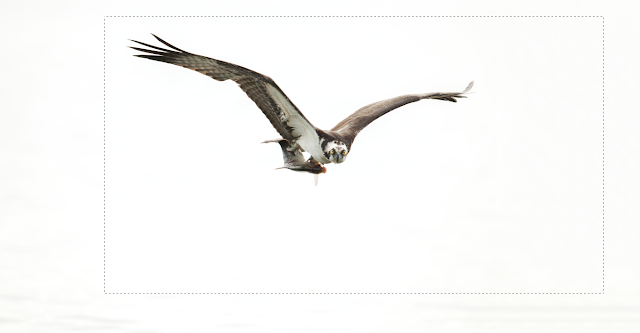
The final step was to add some room to the right of the image. To do this, I went to the Image drop down menu and selected Canvas Size. I added 20% width to the right side only, and chose white as the fill color. Then I used the Rectangular Marquee tool to make a selection around the added area. To fill this in with a more realistic color, I used Content Aware Fill (under the Edit drop down menu, select Fill and choose content aware as the Content). The area selected will fill with a color that matches the sky almost perfectly. The final step was to crop it to the desired size. That's it!
 |
| After adding more area to the right of the image and preparing for a crop |

Great Tutorial! I'll definitely have to apply these tips when/if I use Photoshop.
ReplyDeleteNow that you mentioned using CAF to change the composition of the image, it is very obvious to me in the final image. There is a faint yellow/white line beyond his left wing. I wonder if you could clean that up or desaturate it.